Table Of Content
- Introduction
- Overview
- Step-1 Set up your Webhook Service
- Step-2 Create Webhook
- Step-3 Test your Webhook
- Step-4 Add filters/headers to Webhook
- Step-5 Activate/Deactivate Webhook
- Next Steps
Introduction
Web3 dApps have evolved significantly in terms of complexity and popularity over recent years. However, they often fall short in user experience when compared to Web2 applications.
A crucial feature that's absent is instant event notifications. It's essential for users to be instantly informed about the execution of their trades, transaction failures, acceptance of their auction bids, or when a specific wallet engages with a new token.
Building these instant alerts into your dApp was challenging and prone to errors until the introduction of Chainbase Webhook Sync.
Chainbase Webhooks provide real-time notifications. They enable you to subscribe to specific events or transactions and receive updates when they happen.
For instance, you can monitor an address's activity, check a transaction's status, or listen to smart contract events using webhooks.
Unlike traditional webhooks, which facilitate communication between web servers by sending HTTP requests to a designated URL upon server events, blockchain webhooks employ Web3 technologies. Ethereum webhooks, specifically, listen to the blockchain and send HTTP requests to a chosen URL when an event occurs on the blockchain.
The advantages of Chainbase Webhooks are as follows:
- Efficiency: They eliminate the need for constant polling or querying of the blockchain, conserving time, bandwidth, and resources.
- Reactivity: Webhooks allow immediate responses to blockchain events like transfers or contract executions. They can trigger actions such as notifications, database updates, or server/client logic execution.
- Integration: They bridge your Web3 applications with other web services, enabling data exchange and workflow automation based on blockchain activity.
- Customization: Webhooks offer control and adaptability, letting you tailor them to your needs, from event subscriptions to data filtering and notification settings.
Overview
In this article, I'll show you how to receive real-time ERC20 transfer data and monitor large funds transfers in real-time using Sync - Webhook and Telegram bot.
Before we start, we need to make the following preparations to
- Apply for a Chainbase API-Key for webhook Service.
- Create a Webhook URL to receive message push. In this article, I will use AirCode as my Webhook URL service provider to handle large funds transfer events.
- Create a Telegram Bot as a convenient notification reminder. Details about how to create a telegram bot: https://core.telegram.org/bots/api
Step-1 Set up the Webhook
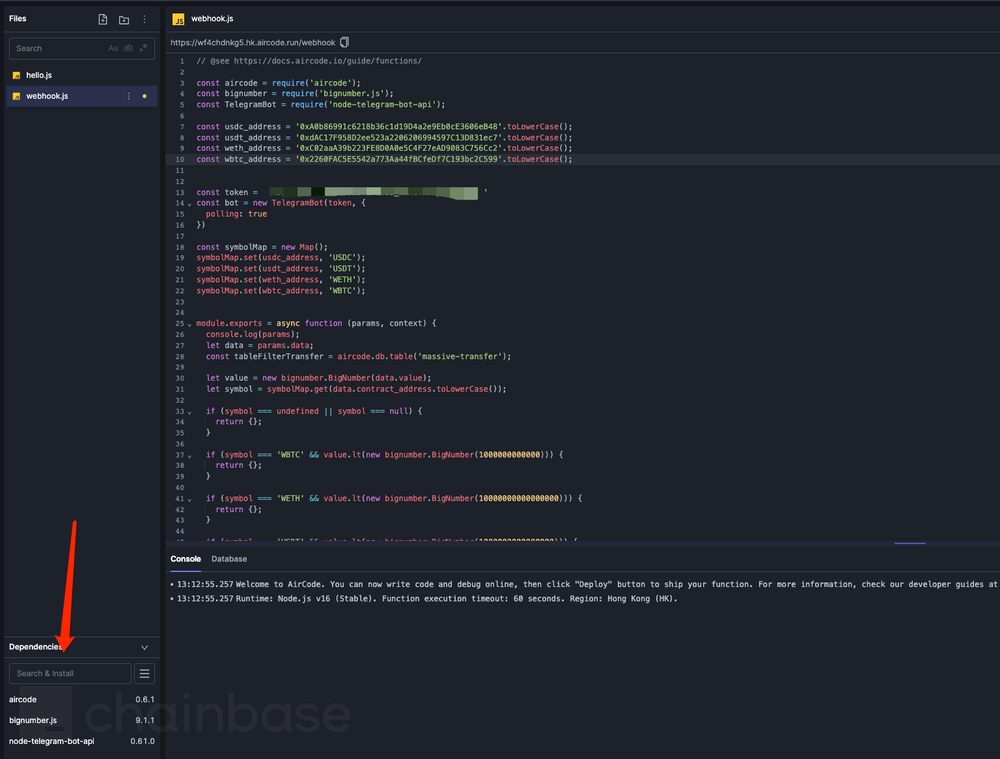
In this case, I will create a Webhook to handle large funds transfer events and trigger a telegram message event. Parse the following code and deploy it on the AirCode platform.
📢 Notice: You need to install some dependencies manually.
// @see https://docs.aircode.io/guide/functions/

const aircode = require('aircode');
const bignumber = require('bignumber.js');
const TelegramBot = require('node-telegram-bot-api');

const usdc_address = '0xA0b86991c6218b36c1d19D4a2e9Eb0cE3606eB48'.toLowerCase();
const usdt_address = '0xdAC17F958D2ee523a2206206994597C13D831ec7'.toLowerCase();
const weth_address = '0xC02aaA39b223FE8D0A0e5C4F27eAD9083C756Cc2'.toLowerCase();
const wbtc_address = '0x2260FAC5E5542a773Aa44fBCfeDf7C193bc2C599'.toLowerCase();

const token = 'YOUR-TELEGRAM-TOKEN'
const bot = new TelegramBot(token, {
  polling: true
})

const symbolMap = new Map();
symbolMap.set(usdc_address, 'USDC');
symbolMap.set(usdt_address, 'USDT');
symbolMap.set(weth_address, 'WETH');
symbolMap.set(wbtc_address, 'WBTC');

module.exports = async function (params, context) {
  console.log(params);
  let data = params.data;

  let value = new bignumber.BigNumber(data.value);
  let symbol = symbolMap.get(data.contract_address.toLowerCase());
//Remember, every token has a different decimal.
  if (symbol === undefined || symbol === null) {
    return {};
  }


  if (symbol === 'WBTC' && value.lt(new bignumber.BigNumber(1000000))) {
    return {};
  }

// change your amount limit
  if (symbol === 'WETH' && value.lt(new bignumber.BigNumber(10000000))) {
    return {};
  }

// change your amount limit
  if (symbol === 'USDT' && value.lt(new bignumber.BigNumber(100000000))) {
    return {};
  }

// change your amount limit
  if (symbol === 'USDC' && value.lt(new bignumber.BigNumber(1000000000))) {
    return {};
  }

  let msg = {
      "block": data.block_number,
      "transaction_hash": data.transaction_hash,
      "from_address": data.from_address,
      "to_address": data.to_address,
      "value": data.value,
      "symbol": symbol,
  }

  try {
		var jsonPretty = JSON.stringify(msg,null,'\t');
    await bot.sendMessage('YOUR-TELEGRAM-CHAT-ID', jsonPretty);
  } catch (e) {
    console.log(e);
  }

  return {
    msg,
  };
};
As you can see from above, I implemented the filtering and monitoring of large funds of ERC20 transfers in the code. All you need to do is deploy the webhook.
After deploying the code, we got a webhook URL like https://xxxxxx.hk.aircode.run/erc20transfer for Chainbase Sync. Then we can continue to the next step.
Step-2 Test your Webhook
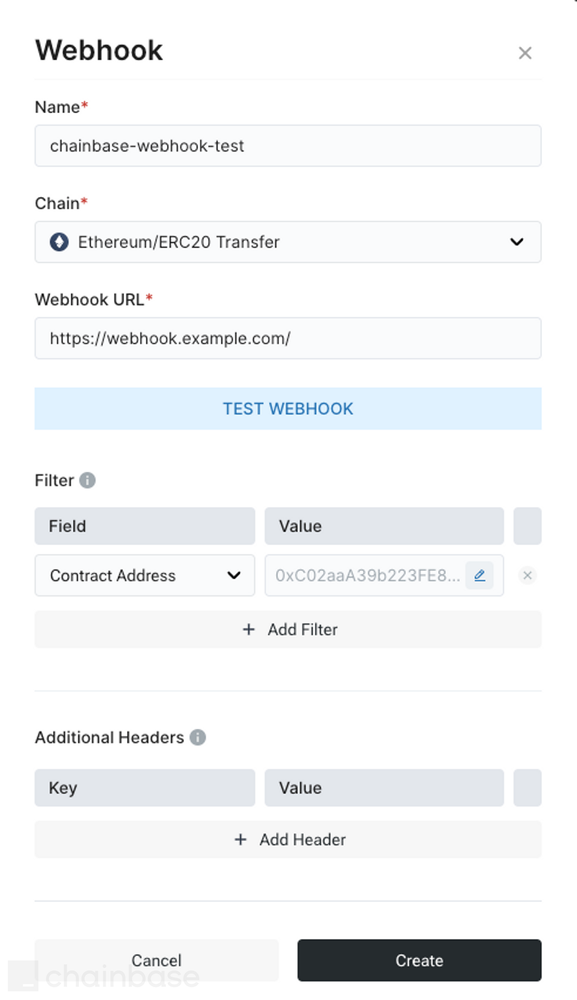
Enter your webhook URL and just click TEST WEBHOOK. Check the logs and request history on your AirCode Webhook Service. You can check your webhook status and when everything is ok we proceed to the next step.
Step-3 Create Webhook Sync Job
Here is a filter objects example:
[
    {
      "field": "contract_address",
      "values": [
        "0xC02aaA39b223FE8D0A0e5C4F27eAD9083C756Cc2", // weth
        "0x2260FAC5E5542a773Aa44fBCfeDf7C193bc2C599", // wbtc
        "0xA0b86991c6218b36c1d19D4a2e9Eb0cE3606eB48", // usdc
        "0xdAC17F958D2ee523a2206206994597C13D831ec7"  // usdt
      ]
    }
  ]
In this example, I want to filter four token contract addresses: WETH, WBTC, USDC, USDT. So I set my filter with the field contract_address and set the token contract addresses above to the values list. If your Webhook need authentication you can modify and add authentication to additional_headers field.
Request Review
curl -X "POST" "https://api.chainbasehq.online/sync/webhook/v1/webhook/{webhook_id}/activate_webhook" \
     -H 'x-api-key: <YOUR-API-KEY>' \
     -H 'Content-Type: application/json'
When all set, click the Create button and get everything set up. It may take some time to launch your webhook job, just be patient and check the status of the webhook. If your webhook fails 50 times, it will be reset to deactivated status.
Step-4 Add filters/headers to Webhook
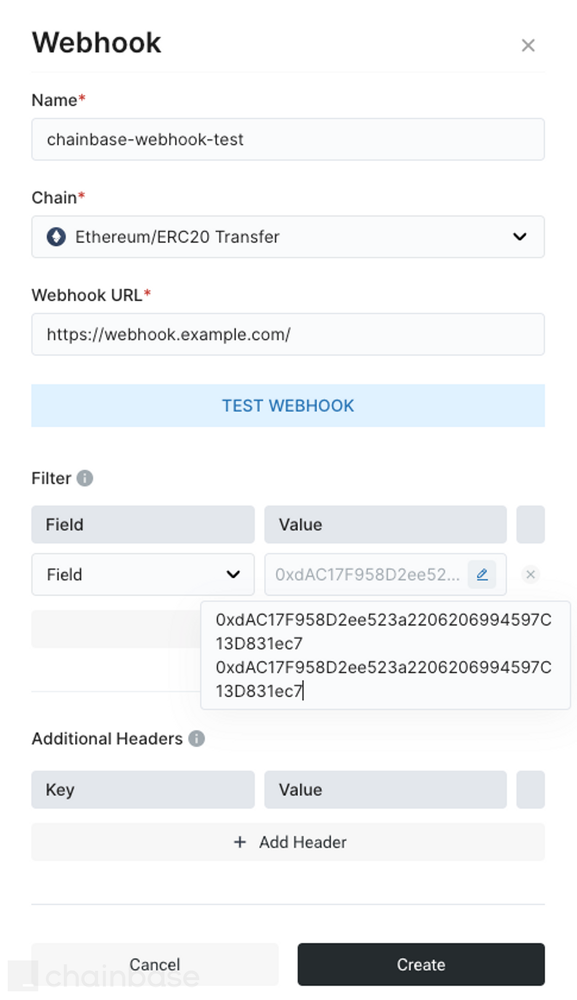
From the previous steps we create a webhook without any additional headers and filters and this kind of webhook is resource-consuming, especially when I don’t care about other tokens’ logs.
In this scenario, I would create a filter to reduce my watch. I would add the contract address in the filter like:
Step-5 Activate Webhook Sync
After we create a Webhook successfully, we can see and manage our webhooks from the dashboard.

When you think you are ready for the webhook message, just activate the webhook.


Then you can check your telegram if the real-time messages are sent like this:

Enjoy your time building with Webhook API.
About Chainbase
Chainbase is an open Web3 data infrastructure for accessing, organizing, and analyzing on-chain data at scale. It helps people to better utilize on-chain data by combining rich datasets with open computing technologies in one data platform. Chainbase’s ultimate goal is to increase data freedom in the crypto.
More than 5,000 developers actively interact with our platform and over 200Mn data requests per day as their data backend and integrate chainbase into their main workflow. Additionally, we are working with ~10 top-tier public chains as first-tier validators and managing over US $500Mn tokens non-custodially as a validator provider. Find out more at: chainbase.com
Want to learn more about Chainbase?
Sign up for a free account, and Check out our documentation.
Website|Blog|Twitter|Discord|Link3
